An active community thrives not only on content, but also on members feeling seen.
If someone regularly posts, helps others, comments, gets likes, or has been part of your community for a long time, that’s more than just activity. It’s engagement. And now you can make that engagement more visible.
That's what the new community awards are for.
Badges can no longer be awarded manually only. You can also have them awarded automatically based on specific events or activities—for example, on birthdays, when someone joins the community, on anniversaries, or for particularly active members.
This creates small, visible moments of recognition without you having to manually award each badge individually.
In a nutshell
- Community badges can now be awarded manually or automatically
- New badge types for birthdays, joining the community, anniversaries, and top posters
- Flexibly configure anniversary and top poster badges with time periods, expiration dates, and recurrence
- New milestones for posts, comments, likes, years of membership, and activity streaks
What's New?
With the new community awards, you can tailor recognition within your community in a much more flexible way.
Until now, badges have been awarded manually. You can still do that. What’s new is that you can now have many awards granted automatically. To do this, when creating a badge, select the type of award you want and the rule according to which it will be awarded.
It could be a one-time event, such as a birthday. But it could also be a recurring occasion, such as a membership anniversary. Or it could be related to activity, such as when someone is among the most active contributors over the past few days.
In addition, there are new milestones that allow members to track their progress within the community—such as posts, comments, likes, or activity streaks.
This not only counts engagement, but also makes it visible.
What badges are available?
When creating a new badge, first select the appropriate badge type.
The following types are currently available:
Recognition
A manual badge for selected members. This type is ideal if you want to recognize specific individuals—for example, for special support, helpful contributions, or personal dedication.
Birthday
An automatic badge awarded on a member's birthday. This lets you highlight personal moments within your community.
Join the Community
A badge awarded when a member joins the community. This is useful, for example, for welcoming new members or highlighting their entry into the community.
Anniversary
An automatic badge that is awarded after a configured period of time. You can use this, for example, to recognize members who have been part of your course platform or community for a year.
Top Poster
An automatic badge for members who are particularly active during a specific time period. This allows you to highlight members who are currently contributing a lot to the community.
.webp)
An In-Depth Look at Automatic Badges
Most automatic badges (birthday, join date, anniversary) are processed once a night. Top Poster badges are updated several times a day.
Birthday Badges
With birthday badges, you can automatically recognize members on their birthdays.
If a member has entered a date of birth in their profile, the badge can be automatically awarded on their birthday. This makes the birthday visible to the community without you having to manually verify each member.
In the badge dialog, you can customize the name, icon, and description. By default, it might say, for example:
Awarded on a member's birthday.
.webp)
Community Membership Badges
Community membership badges are awarded when a member joins the community.
This type of badge is particularly well-suited for welcoming new members in a more visible way. Especially in larger communities, this can help people feel like part of the group more quickly.
For example, you can use the badge to recognize new members as they get started or to highlight the starting point of their community journey.
Anniversary Badges
Anniversary badges are suitable for time-based and recurring awards.
For example, you can use this to recognize members who have been with you for a year, have been part of your course platform for several years, or have reached a certain milestone.
There are several settings you can configure:
Standard Timeline in Days
Here, you can set how long the badge will remain visible.
For example, an anniversary badge can be displayed for seven days and then automatically disappear.
Reference
The reference date determines the starting date for the calculation.
One example is the date of joining the members-only area.
Time Period and Unit
Here you can specify the time period after which the badge is awarded.
For example: 1 year.
Repeat annually
If this option is enabled, the anniversary badge can be awarded again each year.
This allows recurring membership anniversaries to be tracked automatically.
Example
A member has been part of your course platform for one year. The anniversary badge is awarded automatically, remains visible for seven days, and may reappear next year. This allows you to highlight membership and long-term participation without having to manually manage recurring anniversaries.
.webp)
Top Poster Badges
Top Poster badges recognize particularly active members.
The system reviews a specific time period and identifies which members were among the most active contributors during that time.
You can set the following:
Top Percentile
Here, you can specify the size of the group to be highlighted.
For example: the top 5 percent.
Period in days
Here, you specify the time period to be analyzed.
For example: the last 14 days.
Example
You want to highlight the most active members from the past two weeks. In that case, you can create a "Top Poster" badge that is awarded to the top 5 percent of contributors over the past 14 days.
This is especially helpful in active communities because engagement doesn't just happen in the moment—it's also visibly recognized.
.webp)
Community Milestones
In addition to the new badge types, there are also milestones.
You can create milestones under Community → Milestones. To use them, you must first enable gamification: Community → Settings → Enable gamification for the entire community.
Milestones make progress visible. They show members what they have already achieved in the community and which activity levels they are progressing through. This isn't about individual event badges, but rather about levels that are earned through specific activities.
Milestones can be enabled for the following areas:
Posts
Levels based on the number of posts made, for example: First Post, Chatty, Prolific, Content Creator, Author, or Guru.
Comments
Levels based on comments posted, for example: First Comment, Contributor, Conversation Starter, Community Voice, or Discussion Lead.
Likes Given
Levels based on the types of reactions given, for example: First Like, Supporter, Encourager, Champion, or Super Supporter.
Likes Received
Levels based on the reactions received, for example: First Appreciation, Liked, Recognized, Popular, or Favorite.
Years of Membership
Levels based on years in the community, for example: One Year, Two Years, Three Years, Four Years, or Five Years.
Activity Series
Levels based on the current activity series, for example: First Day, One Week, Two Weeks, One Month, or Hundred Days.
Each milestone can be enabled or disabled individually. You can also edit the names and thresholds for the levels. For example, you can customize the names of the individual levels and the values at which they are reached.
.webp)
The icons for milestones are predefined and cannot be customized. This is different for event badges, such as birthdays: In those cases, the icon can be edited.
This turns simple activity into visible progress—and makes it easier for members to see what they've already accomplished and what the next steps are.
How to Set Up Community Awards
To use the badges and milestones, you must enable gamification.
To do this, go to your member area and click Community → Settings → Enable gamification throughout the community.
.webp)
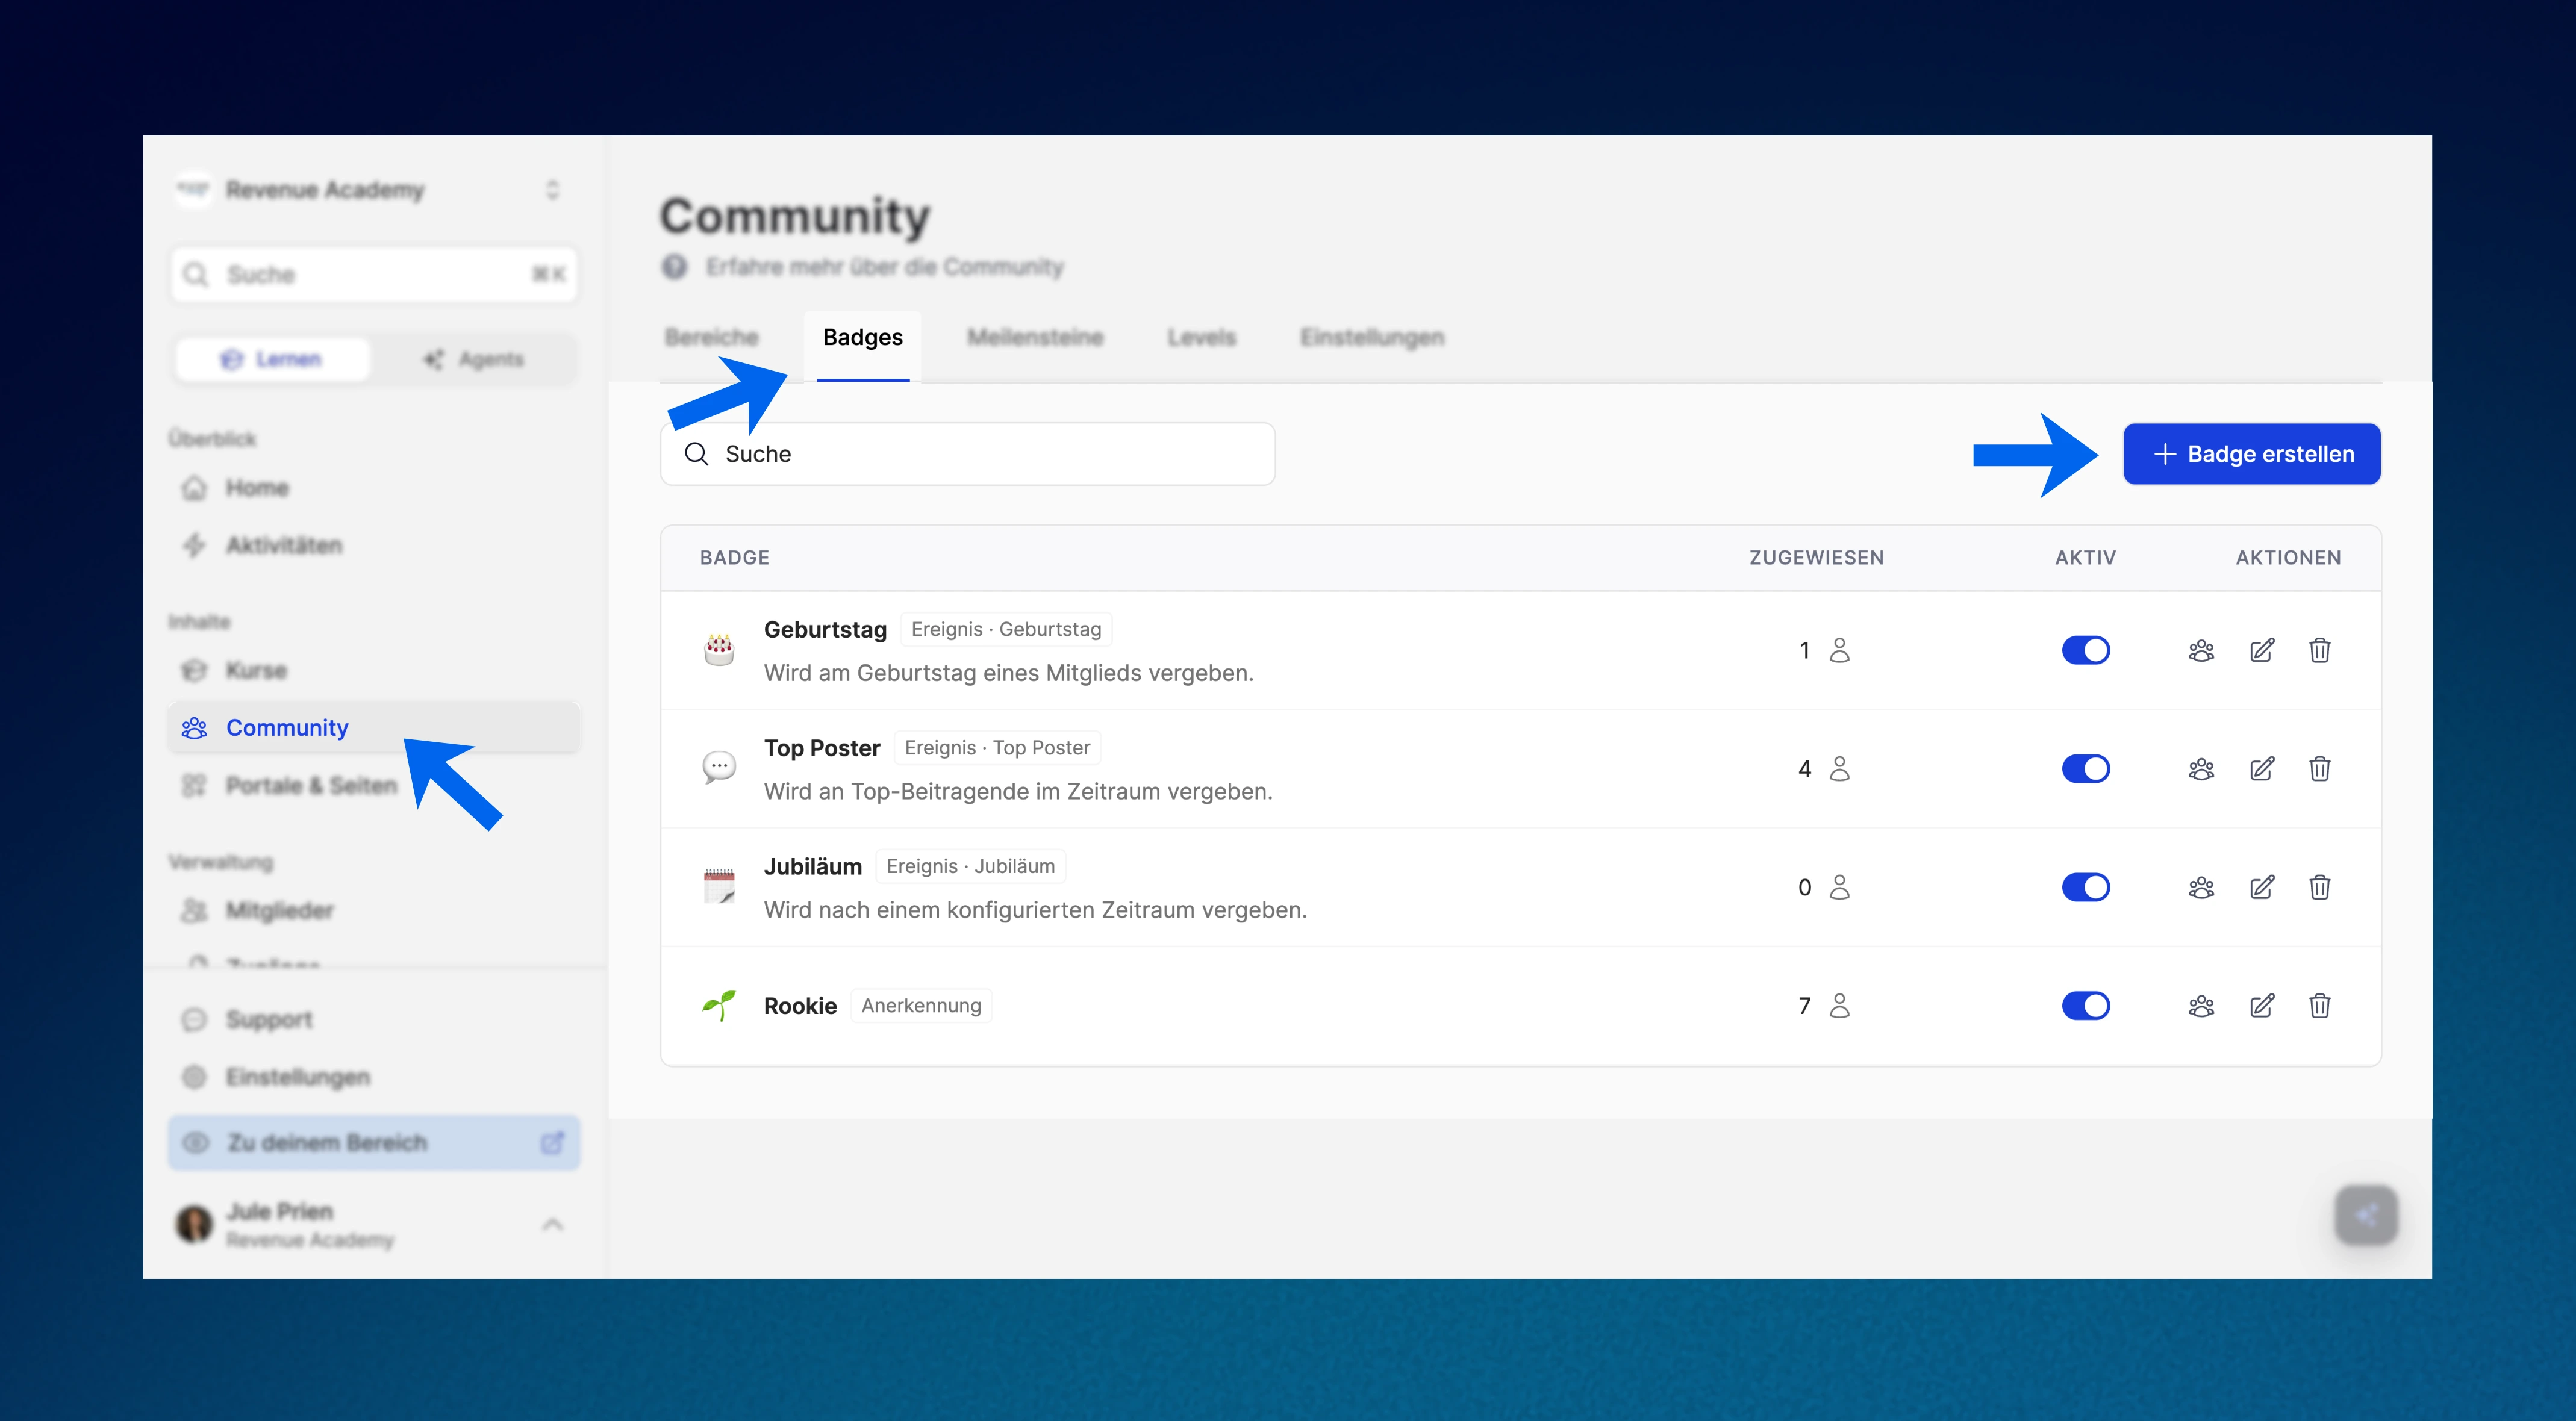
You can create badges under Community → Badges → Create Badge.
Here's how it works:
1. Select badge type
Decide whether you want to create a manual badge or an automatic badge.
2. Specify the details
Customize the name, icon, and description.
3. Configure Conditions
Depending on the badge type, specify when the badge is awarded.
For example, on a birthday, after one year of membership, or for the most active members over the past 14 days.
4. Save
Once saved, the badge will be recognized in the community.
5. Wait for automatic assignment
Depending on the type of badge, the award is presented at different times.
You set up the rules once. After that, the appropriate badges are awarded automatically and, in the case of time-limited awards, removed again.
Why Community Awards Are Important
A lot happens in a community that quickly comes to be taken for granted.
One member regularly posts helpful content.
Someone comments frequently and keeps discussions going.
Another member has been a part of the group for a year.
Or someone has a birthday and should be celebrated publicly on that day.
Moments like these are important because they foster a sense of belonging.
Badges make engagement visible. They show other members that this person is active, participates, has been a member for a long time, or is currently reaching a special milestone.
This doesn't just motivate individual members. It also makes the community more vibrant because the activity becomes more visible.
Five Tips for Effective Community Awards
1. Don't use badges just as rewards
Badges don't always have to represent achievement. They can also highlight a sense of belonging, special moments, or recurring events.
A birthday badge isn't an achievement award. Still, it can make the community feel more personal.
2. Keep badge names clear
A badge should make it clear at a glance what it stands for.
"Top Poster" makes sense.
"1 Year Here" makes sense.
"Community Starter" can work well if it fits your language.
The clearer the name, the faster members will understand its meaning.
3. Use Anniversaries to Build Loyalty
Membership anniversaries are a simple way to highlight long-term membership.
This can be especially valuable in communities that offer courses, programs, or long-term memberships.
4. Specify how long badges should remain visible
Some badges look especially good when they're only visible for a brief moment.
Birthday badges are automatically displayed only on the person's birthday. For anniversary badges, you can also specify how long they should remain visible—for example, seven days.
This way, such awards remain special and feel more like a one-time event than a permanent part of one's profile.
5. Combine badges with milestones
Badges indicate special achievements. Milestones show progress.
Together, they create a stronger system: Members can see what they’ve been recognized for and how far they’ve come within the community.
To Get You Started
Create a first anniversary badge for members who have been with us for a year.
To do this, select the "Anniversary" badge type, set the join date as the reference, set the duration to 1 year, and enable the annual recurrence if needed.
In this way, membership becomes a visible expression of recognition.
Your community thrives on people who contribute, stick around, and get involved.
The new awards highlight exactly that.